Earlier I was posted an article on Integrating Summernote on MVC ASP.Net . I received couple of feedback’s where users were facing issue with large content as the entire data including image will be send to the database and there will be with size of images.
As we aware that there is TinyMCE editor which lacks in the area of Image Uploading. Image upload is not realistic in TinyMCE, however apart from that it has all the rich text editing features. On the other hand Uploadify is a really simple file uploading jquery plugin which helps us in on the fly uploading of the files.
In this project I have merged the functionality of the above two and integrated with MVC ASP.NET C# for easy implementation in any of the project.
Features:
- Rich Text Editing Features of TinyMCE ( You can enhance the features referring to this documentation )
- Easy Image upload feature with restriction on file extension as well on file sizes.
- Seamlessly integrated Uploadify with TinyMCE , even works well with Multiple Files.
- Uploaded images are stored in the server and only reference is added to text editor hence making the content data small as possible.
- Complete working source code is available in Git Hub for Easy Reference and Download.
- File names of the uploaded files are randomized in order to avoid any conflicts or duplicate file name issues
Step 1 : Download tinymce Editor from https://www.tinymce.com/download/
Extract the entire content into a folder called Tinymce
Step 2 : Download Uploadify :: http://www.uploadify.com/download/
Extract the content to a folder called Uploadify and make sure it has following files
jquery.uploadify.js
jquery.uploadify.min.js
uploadify-cancel.png
uploadify.css
uploadify.swf
Step 3 : Create an Empty MVC project in Visual Studio 2013
Step 4 : Create a Model Called News.cs and add following
______________________________________________________________
using System.ComponentModel.DataAnnotations;
using System.Web;
using System.Web.Mvc;

namespace Haneef_Uploadify.Models
{
public class News
{
[Key]
public int NewsID { get; set; }
public string Title { get; set; }
[AllowHtml]
public string Content { get; set; }
public HttpPostedFileBase Image { get; set; }
}
}
________________________________________________________________
Step 5 :
Create a Controller and Name it as NewsController.cs and copy following Code
______________________________________________________________
using System;
using System.IO;
using System.Web.Mvc;
using Haneef_Uploadify.Models;

namespace Haneef_Uploadify.Controllers
{
public class NewsController : Controller
{

public ActionResult Index()
{
return View();
}

[HttpPost]
public ActionResult Index(News model)
{
return View("NewsDisplay", model);
}
public ActionResult Upload()
{
var file = Request.Files["Filedata"];
string extension = Path.GetExtension(file.FileName);
string fileid = Guid.NewGuid().ToString();
fileid = Path.ChangeExtension(fileid, extension);

string savePath = Server.MapPath(@"~\Uploads\" + fileid);
file.SaveAs(savePath);

return Content(Url.Content(@"~\Uploads\" + fileid));
}
}
}
______________________________________________________________
Step 6 :
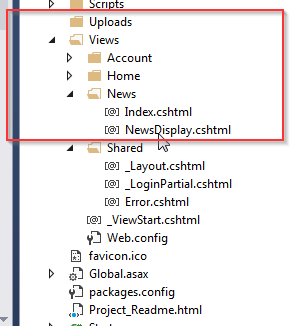
Create a folder called Uploads in the root of the project
Copy the Folder Tinymce (from Step 1 ) into the Scripts folder
Copy the Folder Uploadify (from Step 2) into the Scripts folder
At This step your file structure should look like this

Step 7:
Create a view Under Folder News , Name it as Index.cshtml and copy following Contents.
______________________________________________________________
@model Haneef_Uploadify.Models.News
@{
ViewBag.Title = "Index";
}
<link href="~/Scripts/Uploadify/uploadify.css" rel="stylesheet" />
<script src="~/Scripts/Uploadify/jquery.uploadify.min.js"></script>
<script src="~/Scripts/Tinymce/tinymce.min.js"></script>

<script>
tinymce.init({
selector: '#Content',
height: 500,
theme: 'modern',
plugins: [
'advlist autolink lists link image charmap print preview hr anchor pagebreak',
'searchreplace wordcount visualblocks visualchars code fullscreen',
'insertdatetime media nonbreaking save table contextmenu directionality',
'emoticons template paste textcolor colorpicker textpattern imagetools'
],
toolbar1: 'insertfile undo redo | styleselect | bold italic | alignleft aligncenter alignright alignjustify | bullist numlist outdent indent | link image',
toolbar2: 'print preview media | forecolor backcolor emoticons ',
image_advtab: true,

});
</script>
<script type="text/javascript">
$(function () {

$('#file_upload').uploadify({

'swf': '/Scripts/Uploadify/uploadify.swf',
'uploader': "@Url.Action("Upload", "News")",
'cancelImg': "@Url.Content("/Scripts/Uploadify/uploadify-cancel.png")",
'fileSizeLimit': '1MB', // Add Kb, MB, GB
'buttonText': 'Insert Images...', //Text for button
'queueSizeLimit': 10, // Max number of files allowed
'fileTypeDesc': 'Image Files',
'fileTypeExts': '*.gif; *.jpg; *.png', // File type allowed
'onUploadSuccess' : function(file, data, response) {
tinyMCE.activeEditor.execCommand("mceInsertContent", true, "<img src='" + data + "' alt='Uploaded Image' class='img-responsive' />");
}

})

}
);
</script>

<div class="panel panel-primary">
<div class="panel-heading panel-head">Add News</div>
<div class="panel-body">
@using (Html.BeginForm("Index", "News", FormMethod.Post, new { enctype = "multipart/form-data" }))
{
<div class="form-horizontal">
<div class="form-group">
@Html.LabelFor(model => model.Title, new { @class = "col-lg-2 control-label" })
<div class="col-lg-9">
@Html.TextBoxFor(model => model.Title, new { @class = "form-control" })
</div>
</div>

<div class="form-group">
@Html.LabelFor(model => model.Image, new { @class = "col-lg-2 control-label" })
<div class="col-lg-9">
<input type="file" name="Img" id="file_upload" />
</div>
</div>
<div class="form-group">
@Html.LabelFor(model => model.Content, new { @class = "col-lg-2 control-label" })
<div class="col-lg-9">
@Html.TextAreaFor(model => model.Content, new { @class = "form-control", @row = 5 })
</div>
</div>
<div class="form-group">
<div class="col-lg-9"></div>
<div class="col-lg-3">
<button class="btn btn-success" id="btnSubmit" type="submit">
Submit
</button>
</div>
</div>
</div>
}
</div>
</div>
______________________________________________________________
Step 8 :
Create a view under folder and name it as NewsDisplay.cshtml and copy following content ( This will be used to display the content if you submit the form)
______________________________________________________________
@model Haneef_Uploadify.Models.News
@{
ViewBag.Title = "News Display";
}

<h2>News Display - View The Submitted Content</h2>

<div class="panel panel-primary">
<div class="panel-heading panel-head">Add News</div>
<div class="panel-body">

<div class="form-horizontal">
<div class="form-group">
@Html.LabelFor(model => model.Title, new { @class = "col-lg-2 control-label" })
<div class="col-lg-9">
@Html.DisplayFor(model => model.Title, new { @class = "form-control" })
</div>
</div>
<div class="form-group">
@Html.LabelFor(model => model.Content, new { @class = "col-lg-2 control-label" })
<div class="col-lg-9">
@Html.Raw(Model.Content)

</div>
</div>

</div>

</div>
</div>
______________________________________________________________
At this step your file structure should be like this
Step 9 :
Fine tune Uploadify.css
=> Change the location of the uploadify-cancel.png reference in uploadify.css ( Arround Line Number 74)
In my case it will look like this
______________________________________________________________
.uploadify-queue-item .cancel a {
background: url('/Scripts/Uploadify/uploadify-cancel.png') 0 0 no-repeat;
float: right;
height: 16px;
text-indent: -9999px;
width: 16px;
}
______________________________________________________________
Step 10 :
Open Views => Shared => _Layout.cshtml file
Move the jquery bundle to header section ( this will prevent error throwing by TinyMCE as well Uploadify)
In my case it will look as follows .
______________________________________________________________
<!DOCTYPE html>
<html>
<head>
<meta charset="utf-8" />
<meta name="viewport" content="width=device-width, initial-scale=1.0">
<title>@ViewBag.Title - My ASP.NET Application</title>
@Styles.Render("~/Content/css")
@Scripts.Render("~/bundles/modernizr")
@Scripts.Render("~/bundles/jquery")
@Scripts.Render("~/bundles/bootstrap")
</head>
<body>
<div class="navbar navbar-inverse navbar-fixed-top">
<div class="container">
<div class="navbar-header">
<button type="button" class="navbar-toggle" data-toggle="collapse" data-target=".navbar-collapse">
<span class="icon-bar"></span>
<span class="icon-bar"></span>
<span class="icon-bar"></span>
</button>
@Html.ActionLink("Application name", "Index", "Home", null, new { @class = "navbar-brand" })
</div>
<div class="navbar-collapse collapse">
<ul class="nav navbar-nav">
<li>@Html.ActionLink("Home", "Index", "Home")</li>
<li>@Html.ActionLink("About", "About", "Home")</li>
<li>@Html.ActionLink("Index", "Index", "News")</li>
<li>@Html.ActionLink("Contact", "Contact", "Home")</li>
</ul>
@Html.Partial("_LoginPartial")
</div>
</div>
</div>
<div class="container body-content">
@RenderBody()
<hr />
<footer>
<p>© @DateTime.Now.Year - My ASP.NET Application</p>
</footer>
</div>
@RenderSection("scripts", required: false)
</body>
</html>
______________________________________________________________
Now run the application and browse to the News Controller
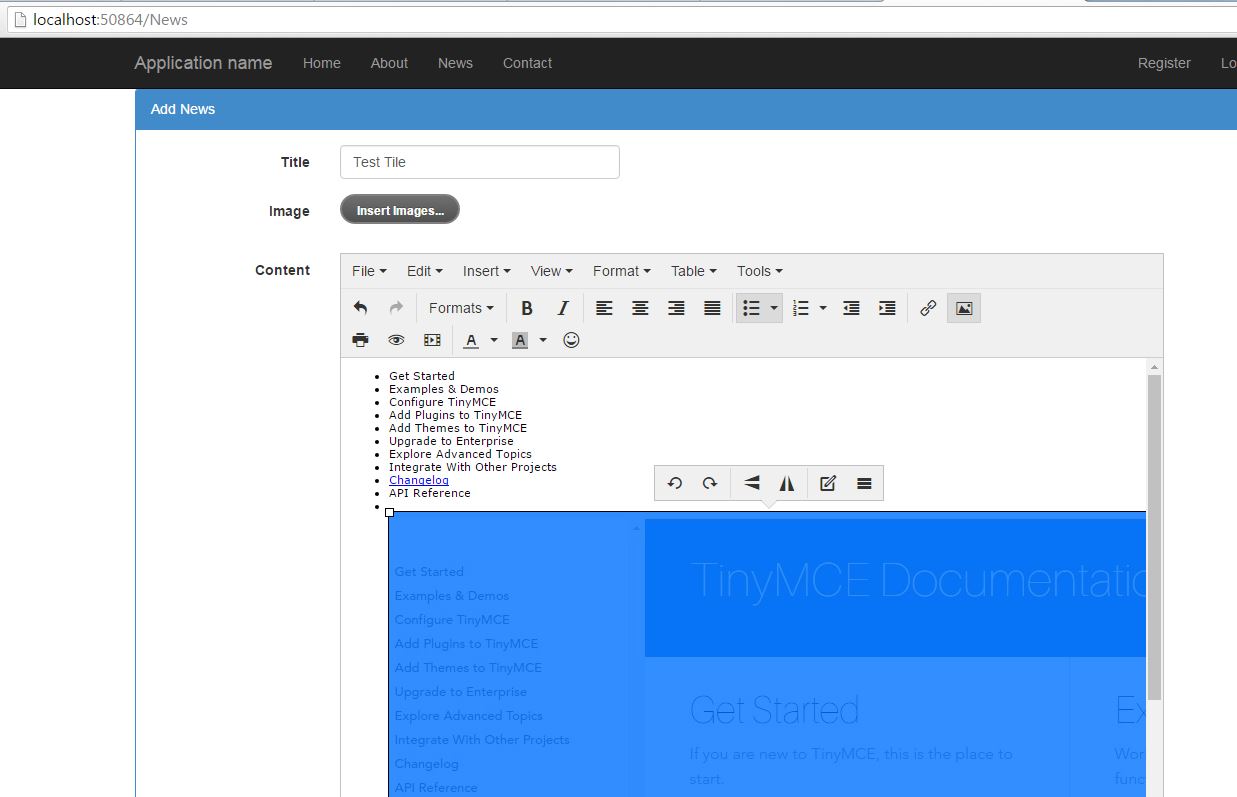
After inserting images , the image will be stored in Uploads folder of the server. If you check this source code it will show like this
____________
<ul> <li><span class="folder">Get Started</span></li> <li><span class="folder">Examples & Demos</span></li> <li><span class="folder">Configure TinyMCE</span></li> <li><span class="folder">Add Plugins to TinyMCE</span></li> <li><span class="folder">Add Themes to TinyMCE</span></li> <li><span class="folder">Upgrade to Enterprise</span></li> <li><span class="folder">Explore Advanced Topics</span></li> <li><span class="folder">Integrate With Other Projects</span></li> <li><a href="https://www.tinymce.com/docs/changelog/">Changelog</a></li> <li><span class="folder">API Reference</span><img class="img-responsive" src="Uploads/4a4a0643-c37b-49e9-a2e2-86facc426088.JPG" alt="Uploaded Image" /></li> </ul>
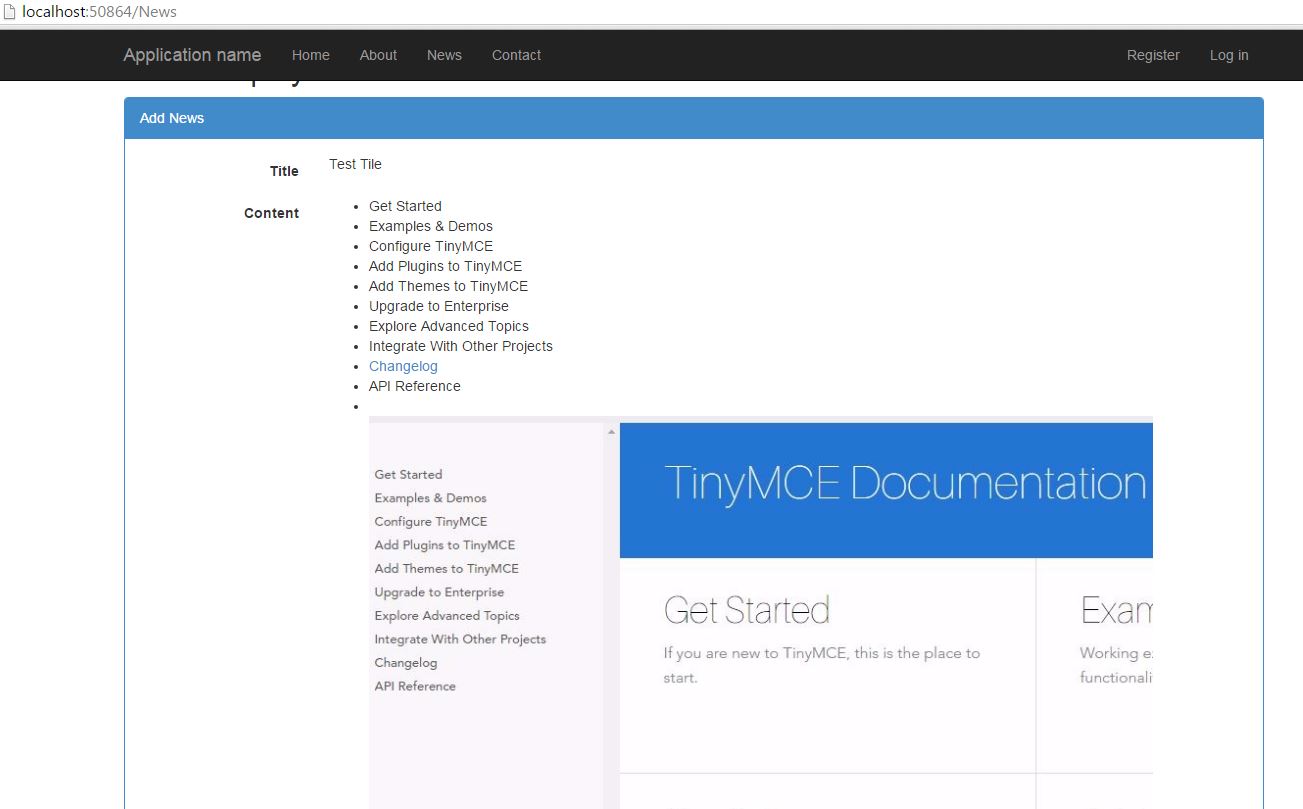
After Submitting it will display the content as follows
Download the Complete working solution from my GitHub :https://github.com/haneefputtur/TinyMCE_Uploadify
To View The Source Code Refer Here : https://github.com/haneefputtur/TinyMCE_Uploadify
Below is The Complete Video Tutorial