Back to Part 2
Mail Configuration
Let’s start by enabling some functionality in postfix. Open the default configuration file with your editor:
sudo nano /etc/postfix/master.cf
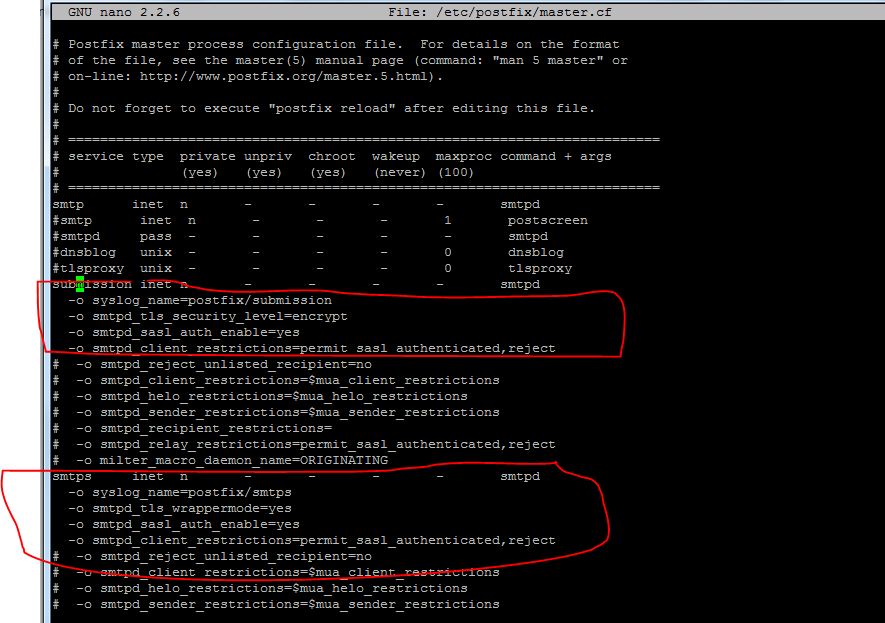
We just need to uncomment some of the lines in this file. Specifically the line that deals with the submission service and the first three option lines beneath, and the smtps service and the first three option lines for that one as well:
submission inet n       -       -       -       -       smtpd
  -o syslog_name=postfix/submission
  -o smtpd_tls_security_level=encrypt
  -o smtpd_sasl_auth_enable=yes
. . .
smtps     inet  n       -       -       -       -       smtpd
  -o syslog_name=postfix/smtps
  -o smtpd_tls_wrappermode=yes
  -o smtpd_sasl_auth_enable=yes
Now, we need to append an additional option under both of these services. It will be the same for each:
submission inet n       -       -       -       -       smtpd
  -o syslog_name=postfix/submission
  -o smtpd_tls_security_level=encrypt
  -o smtpd_sasl_auth_enable=yes
  -o smtpd_client_restrictions=permit_sasl_authenticated,reject
. . .
smtps     inet  n       -       -       -       -       smtpd
  -o syslog_name=postfix/smtps
  -o smtpd_tls_wrappermode=yes
  -o smtpd_sasl_auth_enable=yes
  -o smtpd_client_restrictions=permit_sasl_authenticated,reject
Save and close the file when you are finished
Another mail related service that we should configure is mailman, which can handle mailing lists.
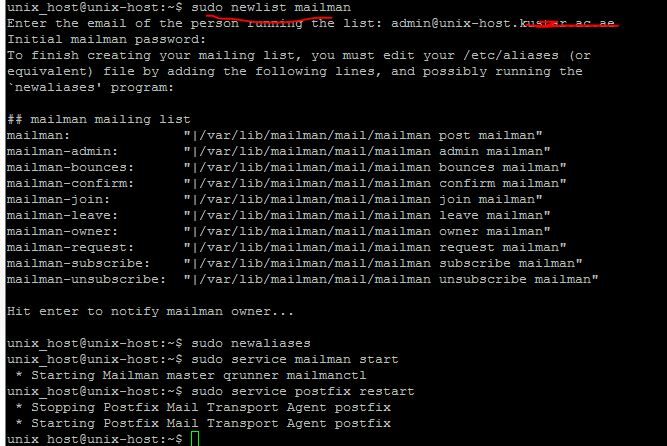
We can start off by telling it to create a new list:
sudo newlist mailman
You will be asked to provide the email that will be associated with the list. You will also be asked to select a password.
The script will output a long list of aliases. You should add those to the bottom of the your /etc/aliasesfile:
sudo nano /etc/aliases
It should look something like this:
postmaster:     root
mailman:              "|/var/lib/mailman/mail/mailman post mailman"
mailman-admin:        "|/var/lib/mailman/mail/mailman admin mailman"
mailman-bounces:      "|/var/lib/mailman/mail/mailman bounces mailman"
mailman-confirm:      "|/var/lib/mailman/mail/mailman confirm mailman"
mailman-join:         "|/var/lib/mailman/mail/mailman join mailman"
mailman-leave:        "|/var/lib/mailman/mail/mailman leave mailman"
mailman-owner:        "|/var/lib/mailman/mail/mailman owner mailman"
mailman-request:      "|/var/lib/mailman/mail/mailman request mailman"
mailman-subscribe:    "|/var/lib/mailman/mail/mailman subscribe mailman"
mailman-unsubscribe:  "|/var/lib/mailman/mail/mailman unsubscribe mailman"
Save and close the file after you’re done. You need to make postfix aware of the aliases you added. You can do that by typing:
sudo newaliases
We can start the mailman service by typing:
sudo service mailman start
Restart the postfix service to enable mail changes:
sudo service postfix restart
While we’re dealing with services, we should also stop and disable spamassassin. ISPConfig calls this as needed and it does not need to be running all of the time:
sudo service spamassassin stop
We can then tell the server to not start it again at boot:
sudo update-rc.d -f spamassassin removeWe need to enable mcrypt functionality in PHP:
sudo php5enmod mcrypt
Another thing we need to do is enable some of the Apache modules we installed.
sudo a2enmod rewrite ssl actions include cgi dav_fs suexec dav auth_digest fastcgi alias
We also need to make some adjustments to some of the Apache configuration files.
One of the modules that we enabled will currently intercept all of our PHP files. We want to stop it from doing this. Open the suphp configuration file:
sudo nano /etc/apache2/mods-available/suphp.conf
<IfModule mod_suphp.c>
    <FilesMatch "\.ph(p3?|tml)$">
        SetHandler application/x-httpd-suphp
    </FilesMatch>
        suPHP_AddHandler application/x-httpd-suphp
. . .
We are going to replace the top block with a single command. It should look like this when you are finished:
<IfModule mod_suphp.c>
   AddType application/x-httpd-suphp .php .php3 .php4 .php5 .phtml
   suPHP_AddHandler application/x-httpd-suphp
Save and close the file when you are done.
We are going to have to manually create the symbolic link for the mailman Apache file. We can do that by typing:
sudo ln -s /etc/mailman/apache.conf /etc/apache2/conf-available/mailman.conf
We can then enable that by typing:
sudo a2enconf mailman
If you plan on creating sites that host Ruby files, you should comment out the processing of .rb files in the mime.types file. ISPConfig will handle this itself:
sudo nano /etc/mime.types
application/x-rss+xml                           rss
#application/x-ruby                              rb
application/x-rx
Save and close the file when you are done.
Now, we can restart Apache to implement our changes:
sudo service apache2 restart
Miscellaneous Configuration
We still need to edit a few more pieces of the system.
Since ISPConfig is often used to subdivide server space for reselling purposes, providing clients with FTP access is often a requirement. We’ve already installed the necessary software, but we need to make some adjustments.
Start by editing the FTP server’s configuration:
sudo nano /etc/default/pure-ftpd-common
We need to make sure our FTP users are confined to a chroot environment so that they do not interfere with the rest of the system. We can do this by changing the VIRTUALCHROOT setting to true:
VIRTUALCHROOT=true
Since FTP is inherently insecure we should at least protect it with TLS encryption. We can set this up by creating a flag file that simply contains the 1 character:
sudo nano /etc/pure-ftpd/conf/TLS
1
Now, we need to create a self-signed certificate that the process can use. We can do this by calling:
sudo openssl req -x509 -nodes -days 365 -newkey rsa:2048 -keyout /etc/ssl/private/pure-ftpd.pem -out /etc/ssl/private/pure-ftpd.pemThis certificate will be valid for one year. You will have to answer some prompts. Fill them out with your information. The Common Name is perhaps the most important part.
We need to lock down the key file afterwards by typing:
sudo chmod 600 /etc/ssl/private/pure-ftpd.pem
When all of this is done, we can restart the service:
sudo service pure-ftpd-mysql restart
This will allow our FTP daemon to use encryption.
One of the reasons we are getting FTP set up on this system is because we have installed a monitoring daemon called awstats that is configured to expect the existence of this service.
ISPConfig will call awstats as necessary, so it does not need to rely on the cron job that is usually used to poll the server. We can remove this by typing:
sudo rm /etc/cron.d/awstatsContinue Part4