🌤️ DIY IoT Weather Station
Build a Professional Weather Monitoring System with ESP8266 & BME280
Complete Guide with Cloud Dashboard | Total Cost: ~$10-15
📖 What You’ll Build
In this comprehensive tutorial, you’ll create a complete IoT weather station that:
- ✅ Measures temperature, humidity, pressure, and altitude
- ✅ Sends data to your cloud server every 3 minutes
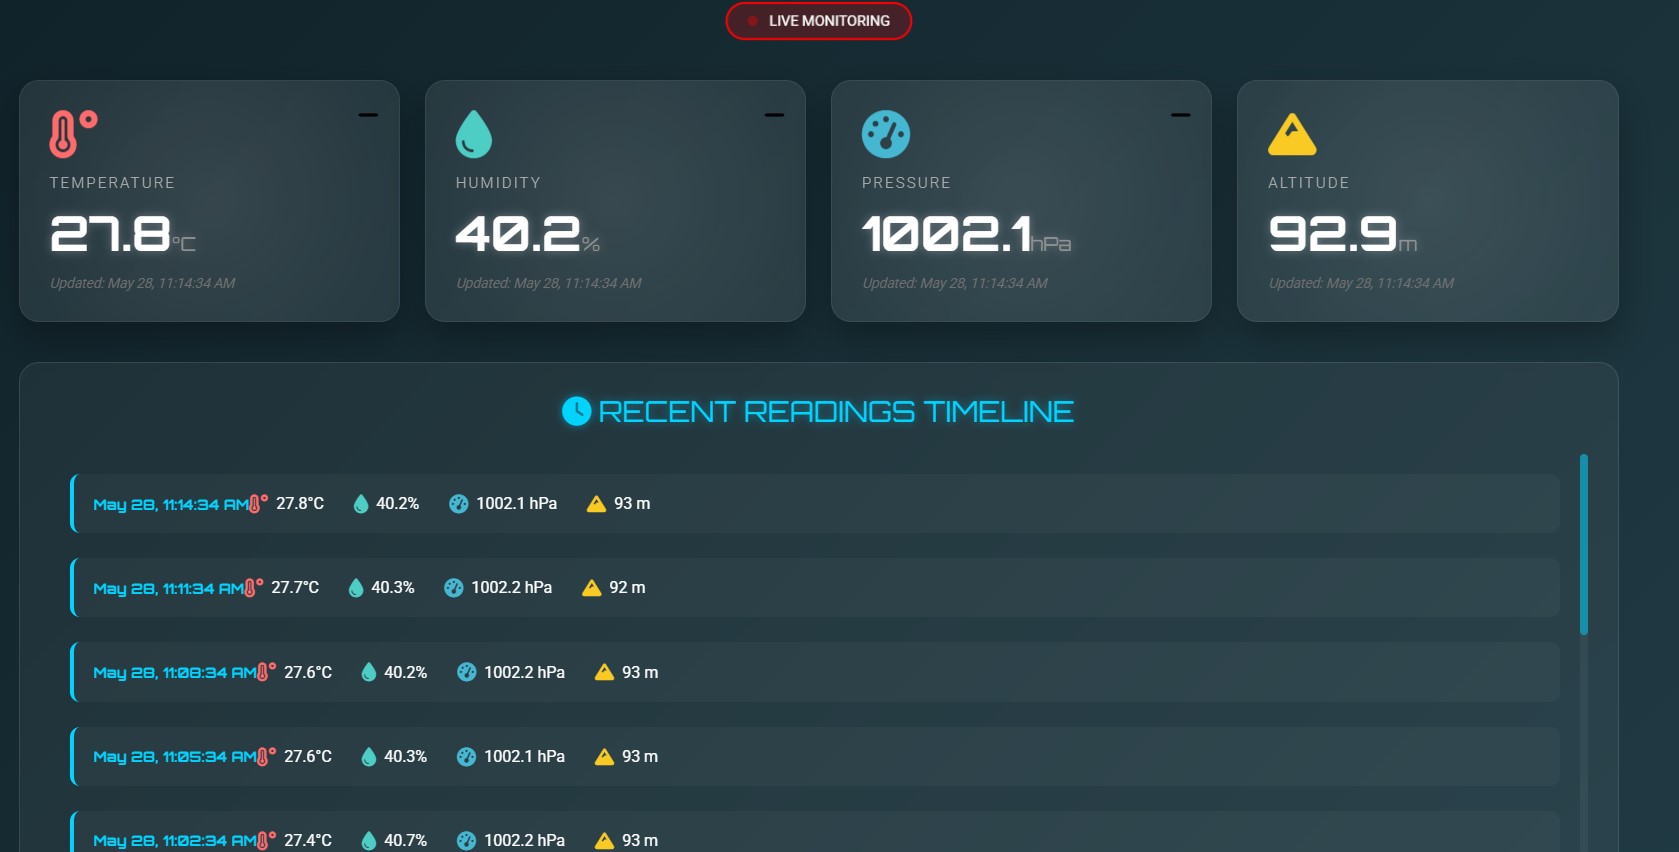
- ✅ Displays real-time data on a beautiful animated dashboard
- ✅ Stores all readings in a MySQL database
- ✅ Supports WiFi configuration via mobile (no code re-upload needed!)
- ✅ Shows historical charts and trends

✨ Key Features
📱 WiFi Portal
Configure WiFi from your phone without re-uploading code. Change networks anytime!
☁️ Cloud Storage
All data automatically saved to MySQL database on your web server.
📊 Live Dashboard
Beautiful animated interface with real-time charts and timeline view.
📈 Trend Analysis
Automatic detection of rising/falling values with visual indicators.
🛠️ Components Required
Hardware Components
| Component | Quantity | Approx. Cost |
|---|---|---|
| ESP8266 NodeMCU (ESP-12E) | 1 | $3-5 |
| BME280 Sensor Module | 1 | $3-5 |
| Micro USB Cable | 1 | $2 |
| Jumper Wires (Female-Female) | 4 | $1 |
| Push Button (Optional) | 1 | $0.50 |
| Total Cost | ~$10-15 | |
Software & Services
- Arduino IDE – Free download from arduino.cc
- Web Hosting – Any hosting with PHP & MySQL (cPanel recommended)
- Domain Name – Optional, can use IP address
📸
🔌 Circuit Wiring
⚠️ Important Warning
The BME280 sensor operates at 3.3V ONLY. Do NOT connect to 5V or you will damage the sensor!
BME280 to ESP8266 Connections
| BME280 Pin | → | ESP8266 Pin |
|---|---|---|
| VCC | → | 3.3V (NOT 5V!) |
| GND | → | GND |
| SCL | → | D1 (GPIO5) |
| SDA | → | D2 (GPIO4) |
Optional: Reset Button
Add a push button to easily reset WiFi configuration:
| Button Pin 1 | → | D3 (GPIO0) |
| Button Pin 2 | → | GND |
Hold button for 5 seconds to reset WiFi settings.
💻 Installation Steps
1 Setup Arduino IDE
1.1 Install Arduino IDE
Download and install from arduino.cc/en/software
1.2 Add ESP8266 Board Support
- Open Arduino IDE
- Go to File → Preferences
- In “Additional Board Manager URLs”, add:
http://arduino.esp8266.com/stable/package_esp8266com_index.json - Click OK
- Go to Tools → Board → Boards Manager
- Search for “ESP8266”
- Install “esp8266 by ESP8266 Community”
1.3 Install Required Libraries
Go to Sketch → Include Library → Manage Libraries, then search and install:
- ✅ Adafruit BME280
- ✅ Adafruit Unified Sensor
- ✅ WiFiManager by tzapu
2 Upload Arduino Code
2.1 Get the Code
Download the complete Arduino sketch from GitHub:
File: weather_station.ino
2.2 Configure Settings
Open the sketch and modify these lines at the top:
// Change this to your server URL
char serverUrl[150] = "https://yourdomain.com/esp12e/receive_data.php";

// WiFi portal name (optional)
const char* apName = "Haneef_Weather_Setup";
const char* apPassword = "haneef123";
2.3 Upload to ESP8266
- Connect ESP8266 to computer via USB
- Select Tools → Board → NodeMCU 1.0 (ESP-12E Module)
- Select Tools → Port → [Your COM Port]
- Click Upload button (→)
- Wait for “Done uploading” message
- Open Serial Monitor (Ctrl+Shift+M)
- Set baud rate to 115200
💡 Tip: If upload fails, hold the “FLASH” button on ESP8266 while uploading.
3 Setup Server (PHP & MySQL)
3.1 Create Database
- Login to your cPanel
- Go to MySQL Databases
- Create a new database (e.g.,
weather_db) - Create a database user with password
- Add user to database with ALL PRIVILEGES
- Note down: database name, username, password
3.2 Upload PHP Files
Download all server files from GitHub:
Files: config.php, receive_data.php, get_data.php, setup_database.php
Using File Manager or FTP:
- Create folder:
/public_html/esp12e/ - Upload all 4 PHP files to this folder
- Edit
config.phpwith your database credentials
3.3 Edit config.php
Update these values with your database information:
define('DB_HOST', 'localhost');
define('DB_NAME', 'your_database_name');     // Change this
define('DB_USER', 'your_database_username'); // Change this
define('DB_PASS', 'your_database_password'); // Change this
3.4 Create Database Table
- Visit:
https://yourdomain.com/esp12e/setup_database.php - You should see: “✓ Table created successfully!”
- IMPORTANT: Delete
setup_database.phpafter setup (security!)
⚠️ Security: Always delete setup_database.php after running it once!
4 Upload Dashboard
Download the beautiful animated dashboard:
File: index.html
- Upload
index.htmlto/public_html/esp12e/ - Visit:
https://yourdomain.com/esp12e/ - You should see the dashboard (may show “Loading…” until data arrives)
Dashboard Features:
- 🎨 Animated background particles
- 📊 Real-time charts (Chart.js)
- ⏱️ Timeline of recent readings
- 📈 Trend indicators (↑↓)
- 📱 Mobile responsive design
- 🔄 Auto-refresh every 3 minutes
📸 

5 Configure WiFi (First Time)
After uploading code, the ESP8266 will create a WiFi hotspot:
📱 On Your Phone/Laptop:
- Open WiFi Settings
- Look for network:
Haneef_Weather_Setup - Connect using password:
haneef123 - Configuration portal opens automatically
(If not, open browser and go to192.168.4.1) - Click “Configure WiFi”
- Select your home WiFi network from the list
- Enter your WiFi password
- (Optional) Enter your Server URL
- Click “Save”
- Device will restart and connect to your WiFi! 🎉
💡 Pro Tip: You can reconfigure WiFi anytime by holding the reset button for 5 seconds, or by temporarily adding wifiManager.resetSettings(); in the code.
🚀 How to Use
Normal Operation
- ✅ Device automatically sends data every 3 minutes
- ✅ Dashboard auto-refreshes every 3 minutes
- ✅ All data is stored in database permanently
- ✅ View real-time readings and historical charts
- ✅ Access from anywhere via your domain
Monitoring Serial Output
Open Serial Monitor (115200 baud) to see:
========================================
       SENSOR READINGS
========================================
Temperature: 28.45 °C
Humidity:    65.20 %
Pressure:    1013.25 hPa
Altitude:    15.30 m
========================================

Sending data to server...
✓ Server Response Code: 200
✓ Data sent successfully!

Next update in 3 minutes...
Changing WiFi Network
Method 1: Press and hold reset button for 5 seconds
Method 2: Power off, add this line to code temporarily, upload, then remove:
wifiManager.resetSettings(); // Add in setup(), upload, then remove🔧 Troubleshooting
❌ BME280 Sensor Not Found
Symptoms: Serial Monitor shows “Could not find BME280 sensor”
Solutions:
- Check all wire connections (especially VCC to 3.3V)
- Verify sensor is not damaged
- Try I2C address
0x77instead of0x76in code - Test with I2C scanner sketch
⚠️ WiFi Hotspot Not Visible
Symptoms: Can’t see “Haneef_Weather_Setup” network
Solutions:
- Wait 30-60 seconds after powering on
- Press reset button on ESP8266
- Check ESP8266 has power (LED should be on)
- Ensure your phone supports 2.4GHz WiFi
- Try from different device
🌐 Data Not Reaching Server
Symptoms: Serial shows error codes like 400, 404, 500
Solutions:
- Error 400: Check server URL is correct (https://)
- Error 404: PHP file doesn’t exist or wrong path
- Error 500: Check PHP syntax and database credentials
- Error -1: WiFi connection issue or DNS problem
- Test URL in browser first
📱 Configuration Portal Won’t Open
Symptoms: Connected to hotspot but no portal appears
Solutions:
- Manually open browser and go to
192.168.4.1 - Disable mobile data on phone
- Try different browser (Chrome, Firefox, Safari)
- Forget the WiFi network and reconnect
- Some phones need “Stay connected” prompt – click Yes
📊 Dashboard Shows “Loading…”
Symptoms: Dashboard loads but shows no data
Solutions:
- Wait 3 minutes for first data to arrive
- Check browser console for errors (F12)
- Verify
get_data.phpworks: visit it directly in browser - Check database has data (use phpMyAdmin)
- Ensure all PHP files are in same folder
⚡ Advanced Features & Customization
Change Data Update Interval
Modify this line in Arduino code (value in milliseconds):
const long interval = 180000; // 3 minutes

// Examples:
// 60000   = 1 minute
// 300000  = 5 minutes
// 600000  = 10 minutes
// 1800000 = 30 minutes
Add Email Alerts
Add this to receive_data.php after data is saved:
// Send email if temperature exceeds threshold
if ($temperature > 35) {
  $subject = "High Temperature Alert!";
  $message = "Temperature: {$temperature}°C at " . date('Y-m-d H:i:s');
  mail('[email protected]', $subject, $message);
}
Clean Old Data Automatically
Add a cron job in cPanel to run this SQL monthly:
DELETE FROM sensor_data
WHERE timestamp < DATE_SUB(NOW(), INTERVAL 30 DAY);
Export Data to CSV
Create export.php to download data:
<?php
require_once 'config.php';
header('Content-Type: text/csv');
header('Content-Disposition: attachment; filename="weather_data.csv"');

$conn = getDBConnection();
$stmt = $conn->query("SELECT * FROM sensor_data ORDER BY timestamp DESC");

echo "Timestamp,Temperature,Humidity,Pressure,Altitude\n";
while ($row = $stmt->fetch(PDO::FETCH_ASSOC)) {
  echo "{$row['timestamp']},{$row['temperature']},{$row['humidity']},{$row['pressure']},{$row['altitude']}\n";
}
?>
📦 Complete Source Code
Get All Files from GitHub
Complete project with Arduino code, PHP files, and dashboard
⭐ View on GitHubDon’t forget to star the repository if you find it helpful! ⭐
📁 Project Structure
weather-station/
├── arduino/
│   └── weather_station.ino       (ESP8266 code)
├── server/
│   ├── config.php                (Database config)
│   ├── receive_data.php          (Receive sensor data)
│   ├── get_data.php              (Retrieve data for dashboard)
│   └── setup_database.php        (Create table - delete after use)
├── dashboard/
│   └── index.html                (Beautiful web dashboard)
├── wiring/
│   └── circuit_diagram.png       (Wiring diagram)
└── README.md                     (Documentation)
🔮 Future Enhancements
📱 Mobile App
Create native Android/iOS app using React Native or Flutter for better mobile experience.
🤖 AI Predictions
Use machine learning to predict weather patterns based on historical data.
🔗 Multiple Sensors
Deploy multiple ESP8266 nodes in different locations and aggregate data.
🏠 Smart Home
Integrate with Home Assistant, Alexa, or Google Home for voice control.
☀️ Solar Power
Add solar panel and battery for completely wireless outdoor operation.
📧 Notifications
Send push notifications or SMS alerts for extreme weather conditions.
🎉 Congratulations!
You’ve successfully built a professional IoT weather station!
This project demonstrates cloud connectivity, real-time data visualization, and modern web development. You can now expand it with additional sensors, features, and integrations!
⭐ If you found this helpful, please star the GitHub repository!
📢 Share this project with fellow makers and IoT enthusiasts!
Last Updated: May 28, 2026
Made with ❤️ by Haneef Puttur