Reducing the size of PDFs improves their performance—particularly when they’re being opened on the web—without altering their appearance.
Using Adobe Acrobat
You can sometimes reduce the file size of a PDF simply by using the Save As command in Adobe Acrobat.
Note: Reducing the file size of a digitally signed document removes the signature.
- Open a single PDF, or select one or more PDFs in a PDF Portfolio.
- Choose Document > Reduce File Size.
- Select the version compatibility that you need.If you’re certain that all your users use Acrobat 9 or Adobe Reader 9, limiting compatibility to the latest version can further reduce file size.
Note: If you select Acrobat 4.0 And Later, and the document contains transparency, the transparency is flattened.
- (Optional) To apply the same settings to multiple files, click Apply To Multiple, and add the files. Click OK, then in the Output Options dialog box, specify your folder and filename preferences.
Note: The Apply To Multiple button is not available in PDF Portfolios.
To control changes and quality trade-offs, use PDF Optimizer, which makes more options available.
Using CutePDF
You can also create a compressed PDF with MS Office for Windows and CutePDF. By default, CutePDF creates significantly smaller file sizes than the other programs commonly used to create pdf files.
CutePDF is a freeware you can download. This also requires PS2PDF converter such as Ghostscript (recommended).
You can get the free GPL Ghostscript 8.15 here. Here are the instructions for using it.
From a scanned document:
Some PDF documents (especially those created with a scanner) tend to have lots of black around the page edges. Too much of this will make the printers jam repeatedly, making it difficult for students to print out the necessary articles. In order to avoid this problem:
- Take the document to a Windows computer in the Humanities Digital Workshop in Eads 007
- Open the pdf with Adobe Acrobat 9 Pro
- From the Document menu, choose “Crop Pages…”
- Use the Margin Controls boxes, circled in the picture below, to specify the length to be cropped from each edge. The arrow points to the rectangle indicating the cropped size of the document.
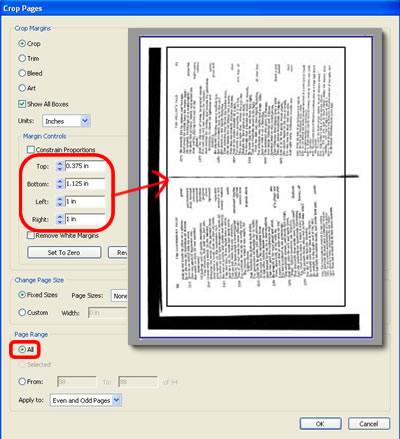
- Under Page Range, at the bottom of the dialog box, choose All. (this is also circled in the picture)
- Click OK.
- Scroll through the document to make sure that you have not cropped actual content off of any page. (If you need to make adjustments, just repeat steps 3 and 4, but make sure that the “Page Range” is just the page you want to adjust.) Remember, you can always Undo if something goes wrong.
- You can now save the edited pdf and distribute it to be printed without the extra black.